|
Apple G5 LED Hack
Version 2
:::::
Update 190505:
History:
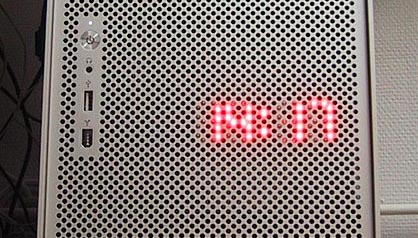
I was looking at the front grid on the computer one day, and it
struck me that 3 mm LED’s would fit perfectly into the front grid
holes. My first thought was to have my name in shining diodes
on it, so I measured and drew up a blue print in Illustrator.
After thinking a while I came to the conclusion that a clock would
be cool. Said and done. I bought a clock radio, took it apart,
and figured out how it worked. I discarded the parts not needed,
and then re-constructed the display from scratch. I drew a new
printed circuit board with two diodes per segment, totalling 58
diodes for the whole display. Then started etching and drilling.
After soldering the LED’s to the PCB it worked perfectly and fitted
my G5 like a glove!
The trickiest part was supplying power. My first thought was to
use the computers internal DC supply, but the clock circuit requires
AC with a frequency of either 50 or 60 Hz in order to keep the
time. So I had to construct a signal generator that delivered
9v AC with exactly 60Hz. This worked as long as the computer was
turned on. But when it was turned off, and the clock automatically
started using it’s own backup-battery - designed to function only
during short power interruptions – the clock ran slow. I had to
find a way to supply power to the clock even when the computer
was turned off. So I chose to use an external AC plug-in adapter
instead, threading the cord through one of the many grid holes
in the back. The best solution also turned out to be the most
simple.
The best thing with my mod is that nothing in the computer has
to be changed. No void warrantys – the clock is completely adaptable
to the computer and it can easily be placed wherever one wants
on the front grid. Yes, it’s not synchronized to an atomic watch,
or even to the computer, but for being a simple LED clock, it
probably has the worlds most beautiful design.
:::::
Today:
a Ready-made clock includes everything you need exept a 5v
AC-adapter, since it has to be prepared for the electric mains
in your country, here in Sweden we have 230v/50Hz. (the cord can
easily be thread through one of the many grid holes in the back.)
To build your own from a DIY-kit you need some soldering-skills,
a good solder iron, a steady hand and of course a 5v AC-adapter.
Instructions included.
By now the clocks are all assambled and tested by hand.
G5
LED-Clock prices:
Ready-made:
Red:
Green:
Blue:
White: |
$85
$95
$105
$105 |
|
DIY-kit:
Red:
Green:
Blue:
White: |
$70
$80
$90
$90 |
|
payment
via: PayPal
free shipping worldwide.
How to order a G5 LED-clock:
• You submit your order by email to order@paulanders.com,
including your full name, adress of delivery, quantity, selected
LED-color and how you want it
(as a DIY or Ready-made).
• I confirm your order by returning a PayPal-link. Your order
is prepared.
• When payment is recieved, your order will be delivered and
followed up by a new email.
best regards
Anders Lundberg
|
|
|